[텐서플로] TFRecord 파일을 이용한 이미지 분류-(2)
by Edward Park
배경
keras를 이용해 만든 모델에서 이전까지는 모델을 학습시킬 때 X,y에 DataFrame이나 Numpy 형태의 데이터만 사용했기 때문에 TFRecord 파일을 모델에 어떻게 학습시켜야하는지 몰라서 헤맸던 기억이 있다. 그래서 이 포스트에서는 간단한 CNN모델을 TFRecord 파일을 이용해 학습하는 법에 대해 설명하고자 한다.
TFRecord 파일명(경로)을 이용해 불러오기
import tensorflow as tf
import numpy as np
from functools import partial
import pandas as pd

from tensorflow.keras import datasets, layers, models
from keras.layers import Dense, Activation, Flatten, Conv2D, MaxPooling2D

import IPython.display as display
import matplotlib.pyplot as plt

def decode_image(image):
    image = tf.image.decode_jpeg(image, channels=3)
    image = tf.cast(image, tf.float32)
    image = tf.image.resize(image, IMAGE_SIZE)
    return image

def read_tfrecord(example, labeled):
    tfrecord_format = (
        {
    'image_raw': tf.io.FixedLenFeature([], tf.string),
    'landmark_id' : tf.io.FixedLenFeature([], tf.int64),
    'id' : tf.io.FixedLenFeature([], tf.string),
        }
        if labeled
        else {"image": tf.io.FixedLenFeature([], tf.string),}
    )
    example = tf.io.parse_single_example(example, tfrecord_format)
    image = decode_image(example["image_raw"])
    if labeled:
        label = tf.cast(example["landmark_id"], tf.int32)
        return image, label
    return image

def load_dataset(filenames, labeled=True):
    ignore_order = tf.data.Options()
    ignore_order.experimental_deterministic = False  # disable order, increase speed
    dataset = tf.data.TFRecordDataset(
        filenames
    )  # automatically interleaves reads from multiple files
    dataset = dataset.with_options(
        ignore_order
    )  # uses data as soon as it streams in, rather than in its original order
    dataset = dataset.map(
        partial(read_tfrecord, labeled=labeled), num_parallel_calls=AUTOTUNE
    )
    # returns a dataset of (image, label) pairs if labeled=True or just images if labeled=False
    return dataset

def get_dataset(filenames, labeled=True):
    dataset = load_dataset(filenames, labeled=labeled)
    dataset = dataset.prefetch(buffer_size=AUTOTUNE)
    dataset = dataset.batch(BATCH_SIZE)
    return dataset
Simple CNN 모델
코드 출처 : tensorflow doc
def make_model(outN):
    model = tf.keras.models.Sequential()
    model.add(Conv2D(input_shape = (*IMAGE_SIZE,3), filters = 20, kernel_size = (3,3), strides = (1,1), padding = 'same'))
    model.add(Activation('relu'))
    model.add(MaxPooling2D(pool_size = (2,2)))
    model.add(layers.Conv2D(64, (3, 3), activation='relu'))
    model.add(layers.MaxPooling2D((2, 2)))
    model.add(layers.Conv2D(32, (3, 3), activation='relu'))

    # prior layer should be flattend to be connected to dense layers
    model.add(Flatten())
    # dense layer with 50 neurons
    model.add(layers.Dense(50, activation = 'relu'))
    # final layer with 10 neurons to classify the instances
    model.add(layers.Dense(outN, activation = 'softmax')) #label의 개수
#    sgd = optimizers.SGD(lr=0.001)
    model.compile(optimizer='adam',
      loss='sparse_categorical_crossentropy',
      metrics=['accuracy'])
    return model

### 모델 학습
```Python
#Set Hyperparameters
BATCH_SIZE = 32
AUTOTUNE=3  #한번의 배치사이즈 학습동안 다음데이터를 얼마나 불러올 것인지
IMAGE_SIZE = [256, 256]
FILENAMES = tf.io.gfile.glob('./trainset/*')
#label개수 및 이미지 샘플 확인
uniqueFiles = ['_'.join(x.split('_')[1:-1]) for x in FILENAMES]
uniqueFiles = list(set(uniqueFiles))
outN = len(uniqueFiles) #총 몇개의 label이 있는지
print(outN)
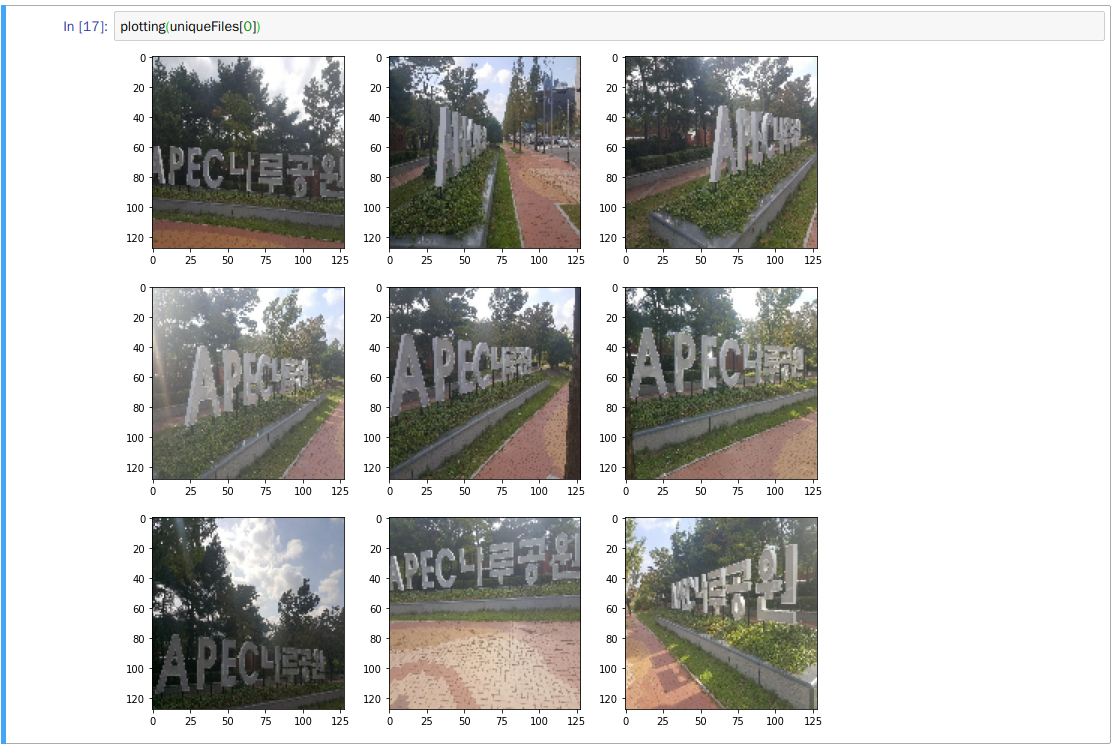
#이미지 jupyter notebook 으로 임포트
def plotting(uF, rows=3, cols=3):
    plotFileNames = [x for x in FILENAMES if uF in x][:rows*cols]

    plotFileNames = get_dataset(plotFileNames)

    plotFileNames = next(iter(plotFileNames))[0]

    plotFiles = [x.numpy().astype(int) for x in plotFileNames]

    fig = plt.figure(figsize=(12,12)) # rows*cols 행렬의 i번째 subplot 생성

    i = 1
    xlabels = ["xlabel", "(a)", "(b)", "(c)", "(d)"]

    for p in plotFiles:
        ax = fig.add_subplot(rows, cols, i)
        ax.imshow(p)

        i += 1

    plt.show()
plotting(uniqueFiles[0])

#model에 들어가는 데이터 형태 확인
firstEpoch = next(iter(get_dataset(FILENAMES)))
print(firstEpoch[0].shape) #[64,128,128,3]
#모델 학습
np.random.shuffle(FILENAMES) #shuffle
train_fn = FILENAMES[:800]
test_fn = FILENAMES[800:]

train = get_dataset(train_fn)
test = get_dataset(test_fn)
model = make_model(outN)
model.fit(train, epochs = 5)
#testing
pred = model.predict(test) #pred(sigmoid)
real = np.array([])
predIdx = np.array([np.argmax(x) for x in pred]) #pred(label)
for t in test:
    real = np.append(real, t[1])

print("accuracy : ", np.mean(real.astype(int) == predIdx))
결과
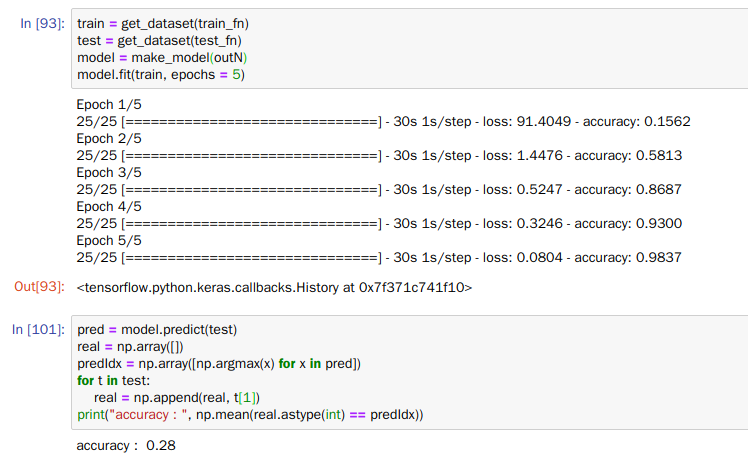
 컴퓨팅 파워가 안좋아 1000개의 이미지(12개의 label)의 데이터만을 이용해 학습해보았다.
모델링 과정에서 accuracy는 98%정도로 나쁘지 않았지만 test dataset에서 accuracy는 28%로 아주 안좋은 결과를 보였다.
이와같이 overfitting이 발생한 이유는 데이터가 1000개로 많지 않았고, 적절한 parameter tuning도 하지않았기 때문이라고 생각된다.(참고로 대회에서 수상권은 99%이상의 정확도를 보임)
